
Pre-Installation Tasks
- Create the databases. Create the databases for the repository, domain configuration, and Data warehouse databases
- Create database user accounts. Create user accounts for the repository, domain configuration, and Data warehouse databases.
Repository user
Informatica
Domain User
Infadom
Installation Process
Stop informatica service before starting installation
Copy Informatica into any location on your hard disk
1) To start the installer from a hard disk, run install.exe from the below directory.

Server installation
2)On the main PowerCenter installation window, select Server. The Welcome window introduces the Power Center Standard Edition installation.


3)Click Next.

4)Click Next.
5)The PowerCenter License Key window appears enter the location and file name of the PowerCenter license key or click Browse to locate the license key file.

6)Click Next.
7)The Installation Prerequisites window displays the supported platforms and databases and the disk space requirements. Make sure that all PowerCenter installation requirements are met before you continue the installation.

8)Click Next.
9)The Installation Set window displays the PowerCenter installation options Choose Install PowerCenter 8.1.1.

10)Click Next.
11)The Installation Directory window appears. Use the default directory or click Browse to select a directory.
The default directory on Windows is D:\Informatica\PowerCenter8.1.1

12)Click Next.
13)The Pre-Installation Summary page appears. Review the pre-installation summary to verify that the installer will install PowerCenter components in the correct location and with the options you select.
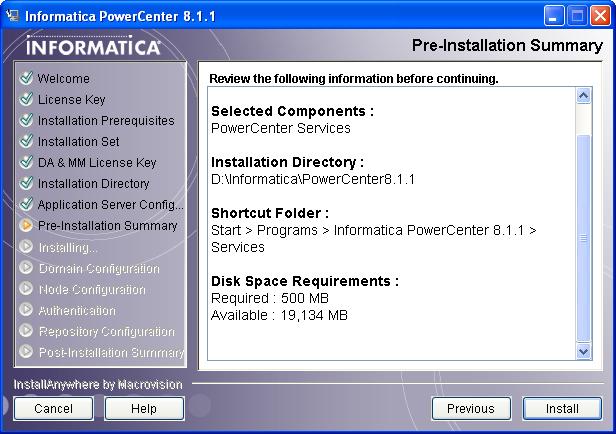
14)Click Install to continue After you click Install, the installer copies the files for the selected components. When the file copy process completes, the Create or Domain window appears.


- PropertyDescription
Database type
Type of database to store the domain configuration. Database type may be Oracle,
Database URL
Host name and port number for the database instance in the format <host name>:<port>.
Database user ID
Domain configuration database account.
Database password
Password for the domain configuration database user account.
Database service name
Service name for Oracle
15)Click Next.

- PropertyDescription
Domain name
Name of the PowerCenter domain to create. The domain name must be in 7-bit ASCII format and must be less than 79 characters. The domain name cannot contain spaces or the following characters: \ / : * ? > < " |
Domain host name
Host name of the machine on which to create the PowerCenter domain. If you create a domain on a machine with a single network name, do not change the default host name. If you create a domain on a machine with multiple network names, you can modify the default host name to use an alternate network name. Optionally, you can use the IP address of the machine on which to create the domain.
Node name
Node name for the current machine. This node name is the gateway node for the domain. This is not the host name for the machine.
Domain port no.
Port number for the current machine. The installer displays a default port number of 6001. If the port number is not available on the machine, the installer displays the next available port number.
Domain user name
User name of the domain administrator. You use this user name to log in to the PowerCenter Administration Console. The user name must be less than 79 characters and can only contain alphanumeric characters.
Domain password
Password for the domain administrator. The password must be between 3 and 16 characters.
Confirm password
Reenter the password.
Create Repository Service
Allows you to create a Repository Service for the PowerCenter repository..
17)Click Next.
18)On Windows, the Configure Informatica Services window appears.Uncheck the Install Informatica with differentnt user account.

19)Click Next.
12)When the installation completes, the PowerCenter Installation Summary window indicates whether the installation completed successfully.

Client Installation
1)On the PowerCenter main installation window, select Client. The Welcome window introduces the PowerCenter Client installation.
Click Next.
The Installation Set window displays the PowerCenter Client installation options.

2)Click Next.
3)The Installation Set window displays the PowerCenter Client installation options.

4)To select the PowerCenter products to install, select Custom and click Next.
5)The PowerCenter Client Components window appears. To install only the PowerCenter Client, clear the Metadata Manager option.

6)Click Next.
7)The Installation Directory window appears.

8)Click Next.
9)The installer displays a message about whether the installation completed successfully. It also shows the location of the PowerCenter Client.
